Announcement

Collapse
No announcement yet.

I tried my hand at TIG

Collapse
X
 
  • Filter
  • Time
  • Show
Clear All
new posts

  • I tried my hand at TIG

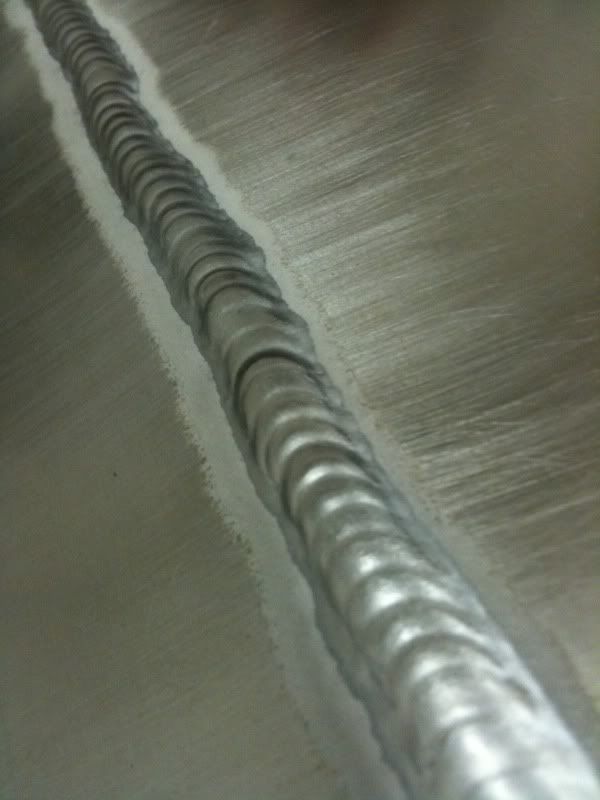
    After playing for about 3 hours I finally started to get a little rhythm. Here is a shot of two pieces of .100" aluminum.


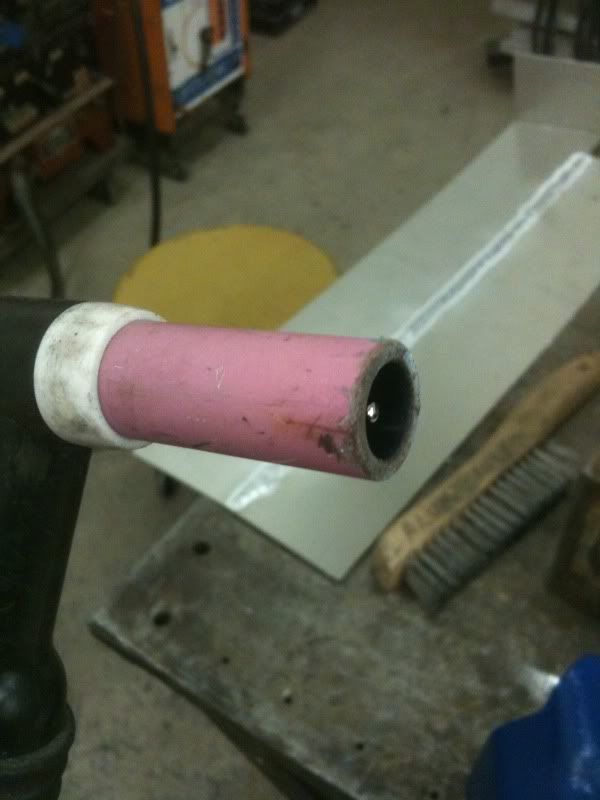
    Now, before you rip on my weld just take into account I was working on a super old Hobart welder that my FIL uses, he is an old schooler and has the attitude of, "I don't know what all the knobs do, but it's adjusted good enough!". So he wouldn't really let me mess with any adjustments. He didn't want me to adjust the tungsten out either, which I know from my reading is all wrong (should be sticking out of the cup, but as you can see it is sunk into the cup), but I am thankful to him for letting me try. Now I really want to pick up a TIG rig.


    Last edited by dville_gt; 01-15-2011, 06:32 PM.

  • #2
    looks good, thats retarted he wouldn't let you pull the tungsten out.
    Interested in being a VIP member and donating to the site? Click here http://dfwmustangs.net/forums/payments.php

    Comment


    • #3
      Originally posted by Mach1 View Post
      looks good, thats retarted he wouldn't let you pull the tungsten out.
      Man! I dont even know how you welded what you did with the tungsten in there like that. Is that bead 1/2" wide and we just cant tell?

      Comment


      • #4
        Lmao, no, they are normal, about the same as my fuel cell welds are. Funny you say that though, it did have a tendency to want to make the bead huge, my FIL blamed it on the part heating up he is a nice guy and offered to "teach" me, it was rather frustrating knowing it was all out of adjustment!

        Comment


        • #5
          you need to weld your FIL's lips shut first!


          Next. You absolutely MUST pull the tungsten out - I'm amazed that you got a decent weld out of that setup!

          Second. The welder, is fine. Now, the welder (the person holding the torch) needs some help. NO, really, it looks pretty good for a newb.

          Find the A/C balance on that machine, it needs to be turned back some - The white etching is much too wide - but could actually be blamed on the long arc (from the sunken in tungsten).

          Extend the tungsten, THEN weld - if the white part is narrower, no adjustment needed.

          Also, that "peaky" look on that beady is due to the frequency and/or heat setting.

          What was the amperage/thickness/tungsten/rod size?

          Comment


          • #6
            150 amps, 3/32 4043 filler, absolutely no idea what tungsten was sunk in there . As crazy as it might sound, I never saw the arc, I just did my best to establish a puddle and guided it with the filler. I really want to get a rig if for no other reason then to be able to use something that is setup properly. Welding inside edges was next to impossible with the tungsten like that, no way to pinpoint the heat at all. I enjoyed doing it, but I think I'd enjoy it a lot more if it were a good setup. Oh, and running out of argon combined with being a newb is a great way to screw up your self confidence, I was scratching my head wondering why all my welds turned to absolute shit and the torch was hot as shit! Live and learn.

            Originally posted by turbostang View Post
            you need to weld your FIL's lips shut first!


            Next. You absolutely MUST pull the tungsten out - I'm amazed that you got a decent weld out of that setup!

            Second. The welder, is fine. Now, the welder (the person holding the torch) needs some help. NO, really, it looks pretty good for a newb.

            Find the A/C balance on that machine, it needs to be turned back some - The white etching is much too wide - but could actually be blamed on the long arc (from the sunken in tungsten).

            Extend the tungsten, THEN weld - if the white part is narrower, no adjustment needed.

            Also, that "peaky" look on that beady is due to the frequency and/or heat setting.

            What was the amperage/thickness/tungsten/rod size?

            Comment


            • #7
              Originally posted by dville_gt View Post
              150 amps, 3/32 4043 filler, absolutely no idea what tungsten was sunk in there . As crazy as it might sound, I never saw the arc, I just did my best to establish a puddle and guided it with the filler. I really want to get a rig if for no other reason then to be able to use something that is setup properly. Welding inside edges was next to impossible with the tungsten like that, no way to pinpoint the heat at all. I enjoyed doing it, but I think I'd enjoy it a lot more if it were a good setup. Oh, and running out of argon combined with being a newb is a great way to screw up your self confidence, I was scratching my head wondering why all my welds turned to absolute shit and the torch was hot as shit! Live and learn.
              That cup is so hot because most of the arc is originating from inside the cup.

              150A is HOT for anything under .200" or so. Judging by those pictures, that's 1/8" material or so.. The amperage has to be so high to get a puddle because of the distance the tungsten is from the material.

              frequency low will burn up/ball up tungsten with the quickness.

              Comment


              • #8
                Originally posted by turbostang View Post
                That cup is so hot because most of the arc is originating from inside the cup.

                150A is HOT for anything under .200" or so. Judging by those pictures, that's 1/8" material or so.. The amperage has to be so high to get a puddle because of the distance the tungsten is from the material.

                frequency low will burn up/ball up tungsten with the quickness.
                Ya, the cup was hot, but when the argon ran out (unbeknownst to me) the whole gun got REAL hot and all I could manage to do was melt the aluminum.

                The material was .100" (calipers actually dialed in at a little under .100"), so I am sure the 150A was too much.

                The part that made it most difficult was I had trouble when trying to back off the amps with the pedal. It was like I had to come in pretty hard on the pedal to get it to arc, then if I tried backing down via the pedal the arc became super unstable.

                Combine that with no pre-heating and it became very hard to deal with the metal when it began getting warm, it was like I'd establish a good puddle, be leading it along with the filler, then the metal would become hot and it would try to increase the width of the puddle uncontrollably, the only recourse I had was to drop the amperage slightly (while still maintaining a decent arc) the pull back the gun slightly (which then lead to an even more unstable arc but seemed to cool slightly). I could just listen to the arc and tell when I had backed off too much (although it was probably still higher amperage then I needed, just less then what it took to keep that arc from the recessed tungsten).

                The more I think about it, the more I think I was really fighting against myself with the setup like it was. I think I am going to just ask him if he minds if I use my own tungsten and assure him I'll return the machine to his current wacky ass settings. I really think if I could just get his machine setup right (then show him, although not sure how willing to learn he is), then he'd have a lot better results. He showed me some stainless he tried to weld, he was like, "stainless is almost impossible to weld with TIG", I asked him if he did it with the machine set like it currently was and he say, "Ya, I don't ever really mess with it". It was DCEP (electrode positive), I am definitely no pro, but everything I have read has said you weld steel/stainless DCEN (electrode negative).

                Comment


                • #9
                  You can forget all of your problems when you get that tungsten out of the cup more.

                  Yes, stainless is DCEN - it won't even come close to working on DCEP.

                  Comment


                  • #10
                    Originally posted by turbostang View Post
                    You can forget all of your problems when you get that tungsten out of the cup more.

                    Yes, stainless is DCEN - it won't even come close to working on DCEP.
                    LMAO, he is a nice guy, but I kind of dread telling him he has his setup completely wrong, he is a "know-it-all" kind of guy who won't want to hear it from a whippersnapper like myself. He then showed me how he just decided to braze the stainless since the TIG wouldn't do it. The worst part is, in his industry he actually does have to weld somewhat regularly, I think if I (even being a total newb) could get his machine setup properly he'd benefit greatly.

                    Do you know of any guides to how the torch is assembled/adjusted? I know the different parts (from watching videos), the cup, the tungsten, the collet/collet body, the back cap and the actual torch itself.

                    For example, do you have to cut the tungsten down to the exact right size to stick out of the cup or does the tungsten just reside inside the torch and it is adjustable? I assume since I see where people pull the tungsten and sharpen it that it does not have to be an exact size that that there is some adjustability as far as moving the tungsten in and out of the torch.

                    When I did inquire to my FIL about the tungsten being sunk into the cup like that he responded that "when I move it out it balls up and recesses back in there like that, see, you want to have a ball on the end like that". This is in total disagreement to what I have read/seen online. I assume the reason it is balling up and recessing is that the amperage is too high and/or he is dipping the electrode into the metal or filler. This sound correct?

                    Comment


                    • #11
                      Originally posted by dville_gt View Post
                      LMAO, he is a nice guy, but I kind of dread telling him he has his setup completely wrong, he is a "know-it-all" kind of guy who won't want to hear it from a whippersnapper like myself. He then showed me how he just decided to braze the stainless since the TIG wouldn't do it. The worst part is, in his industry he actually does have to weld somewhat regularly, I think if I (even being a total newb) could get his machine setup properly he'd benefit greatly.

                      Do you know of any guides to how the torch is assembled/adjusted? I know the different parts (from watching videos), the cup, the tungsten, the collet/collet body, the back cap and the actual torch itself.

                      For example, do you have to cut the tungsten down to the exact right size to stick out of the cup or does the tungsten just reside inside the torch and it is adjustable? I assume since I see where people pull the tungsten and sharpen it that it does not have to be an exact size that that there is some adjustability as far as moving the tungsten in and out of the torch.

                      When I did inquire to my FIL about the tungsten being sunk into the cup like that he responded that "when I move it out it balls up and recesses back in there like that, see, you want to have a ball on the end like that". This is in total disagreement to what I have read/seen online. I assume the reason it is balling up and recessing is that the amperage is too high and/or he is dipping the electrode into the metal or filler. This sound correct?
                      If it has a long back cap, you can use a full length tungsten. If it's a short back cap - you can cut it in half. It's adjustable. Loosen the cap and the tungsten slides in and out. Never use tools to work on your torch setup. All hand tightened.

                      Old school is balling the tungsten, if you have balance and frequency adjust - you can stop that from happening... then with a pointed tungsten, aluminum welds much more like steel does.

                      Comment

                      Working...
                      X